Food Delivery App 8 - Generating Components, Working on Navigation and Reactive Forms in Angular
Introduction:
Angular is providing two ways to work with forms: template-driven forms and reactive forms. These both ways works differently.
Below information will help you to decide which type of form works best for your situation:
- Reactive forms are more robust: they’re more scalable, reusable, and testable. If forms are a key part of your application, use reactive forms.
- Template-driven forms are useful for adding a simple form to an app, such as an email list, signup form. They’re easy to add to an app, but they don’t scale as much as reactive forms. If you have very basic form requirements and logic, use template-driven forms.
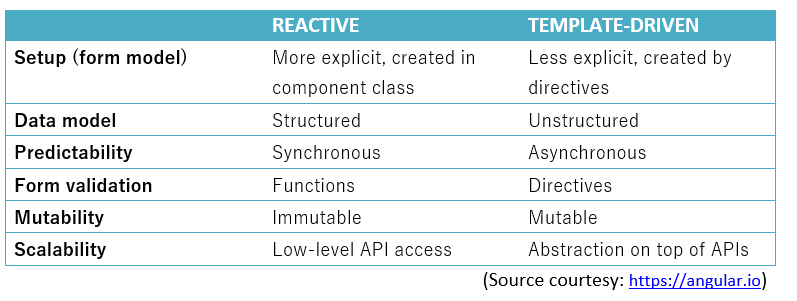
(Source courtesy: https://angular.io)
Key differences:
The table below summarizes the key differences between reactive and template-driven forms.
Basic example of Reactive Forms:
What are Reactive forms?
At first sight Reactive forms might seem complicated but they can be very useful when you actually get it. They are really powerful and flexible.
With Reactive forms we don’t depend on design (template) for creating our forms but instead here we use the API’s provided by angular which is called the Reactive API. These APIs can be used by importing a module called ReactiveModule to create the forms.
With Reactive Forms all the declaration and structuring of the forms is to be done in the code (TS file).This model is then used in template (HTML).
“Reactive forms provide a model-driven approach to handling form inputs whose values change over time.”
Here’s how to get started with Reactive Forms:
- Import Reactive forms module
2)Define the form(formGroup) in a component class.
3)Connect this form to your HTML form.
1) Import Reactive forms module:
Firstly, we have to import ReactiveFormsModule instead of FormsModule in our app.module.ts or in your desired module.
import { ReactiveFormsModule } from ‘@angular/forms’;2) Define the form (formGroup) in a component class:
In our component class we will define the formGroup and also formControls within our formGroup.
formGroup: Entire form will be treated as formGroup and here we can give a name to the formGroup.
formControl: Each ‘input’ in our form will be mapped with formControl. This formControl is like our input box, select box, radio buttons etc. This form control will contain the value and validations of form field.
In short, what we have to do is, we will firstly create formGroup’s object and then inside this formGroup we will create different formControl’s objects as per our need (each formControl object for each inputs we require from user).In this way our formGroup will contain a group (collection) of form controls. And by doing this our entire form is ready to be use in our template (HTML).
Now, one thing to be noted is that we want this form to be there when we load the page so we have to write this formGroup on our TS file’s ngOnInit() method and before starting we have to give name or declare the formGroup.


Comments
Post a Comment