Flutter : Navigation and Routes
Flutter’s navigation and routing system
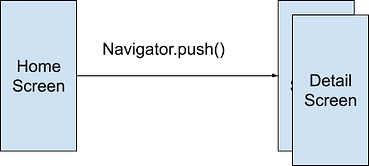
When push() is called, the DetailScreen widget is placed on top of the HomeScreen widget like this:
The previous screen (HomeScreen) is still part of the widget tree, so any State object associated with it stays around while DetailScreen is visible.
Named routes
Flutter also supports named routes, which are defined in the routes parameter on MaterialApp or CupertinoApp:
Now when you want to navigate you’ll just use
Navigator.pushNamed(context, feedRoute);This will navigate you to the FeedView. If we want to pass parameters to the Feed view that’a just a small little change. Let’s make our Feed view take in a String as a parameter.
class Feed extends StatelessWidget {  final String data;  Feed(this.data);  @override
  Widget build(BuildContext context) {
    return Scaffold(
      body: Center(child: Text('Feed: $data')),
    );
  }
}
Add floating action button into your homeView and onPressed we’ll push the feed view and pass in some string data as an argument.
Router / Routing Setup
The MaterialApp provides you with a property called onGenerateRoute where you can pass in a Function that returns a Route<dynamic> and takes in RouteSettings.
This is what we'll use. To keep things neat we'll create a Router
class. In it, we'll create a static function with the signature
mentioned above. Create a router.dart file.
class Router {
  Route<dynamic> generateRoute(RouteSettings settings) {

  }
}
The settings contain the route information of the requested route. It provides two key things to us. The name, and the arguments. We’ll use the name to determine which view to return. Update the generate Function to look like this.

Comments
Post a Comment